Streamlined three-tier loyalty program where every member enjoys the same high-quality rewards, with benefits escalating at each tier.
Simple yet effective, this program stands as the best deal for Eloking's boosting services, ensuring maximum value and satisfaction for all our users.
Cashback on all Eloking boosts (3%, 5%, 7%)
Discounts for all Eloking boosts (5%, 10%, 15%)
Discount for a friend 🤗
Free daily lootbox spin with industry-leading rewards
Member exclusive season and event offers
How to fix Valorant's VAN 9003 error
h
Hamza Rashid
Gamer
25 May 2025
Updated On
Valorant [1] is a game that receives constant updates and also has a dedicated team to ensure the game runs without any issues. However, some errors still get through the Riot cracks, causing players to struggle when attempting to play the game the way they want. Pair that with Riot’s Vanguard anti-cheat, and compatibility issues are more common than one might think.
The VAN 9003 error in Valorant occurs because of system incompatibilities or conflicts with Riot’s anti-cheat software, Vanguard. Fortunately, there are some reliable ways to fix the VAN 9003 error, including checking the status of Secure Boot, rebooting the system, verifying game files, and reinstalling Vanguard.
If Valorant’s VAN 9003 error has been troubling you, you’re in the perfect place, because we have every potential fix for it.
What is the VAN 9003 error in Valorant?
The VAN 9003 error in Valorant usually occurs because of system incompatibilities or conflicts with Riot’s anti-cheat software, Vanguard. It’s most commonly seen on systems that don’t meet Valorant’s security requirements. This could include Windows 11 setups without Secure Boot or TPM (Trusted Platform Module) enabled or machines with restrictive software configurations.
Struggling to win? Bad teammates?
Purchase a game with one of our PRO players.
One game
Average wait time <30 minutes
$4.00
$3.32 per game
Two games
Average wait time <30 minutes
$8.00
$3.00 per game
Three games
Average wait time <30 minutes
$12.00
$2.50 per game
How to fix VAN 9003 in Valorant
Below are the main causes of Valorant's VAN 9003 error:
Missing Secure Boot or TPM 2.0
Unsupported Windows version
Incompatibility with Vanguard Anti-cheat
Driver/System conflicts
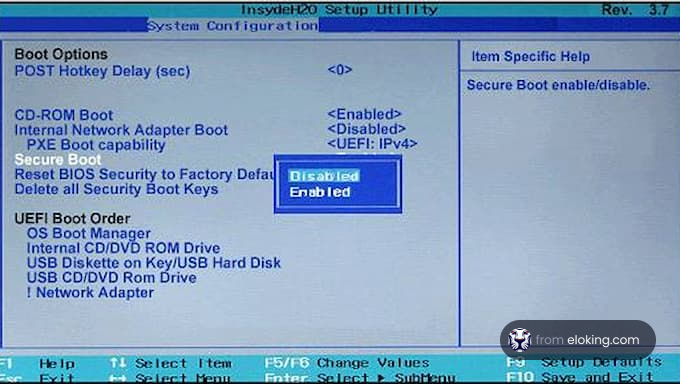
Check the status of Secure Boot
If you’re running into the VAN 9003 error in Valeant, it might be a good idea to check if Secure Boot is turned on. Secure Boot helps your system load only trusted software when it starts up, something both Windows 11 and Riot’s anti-cheat system rely on. Here’s how you can check:
Press Windows + R to open the Run box, then type msinfo32 and hit Enter. This will bring up the System Information window. Look for the entries labeled BIOS Mode and Secure Boot State to see their current state.
Make sure your BIOS Mode is set to UEFI and Secure Boot is enabled. These are required for Windows 11 to function properly, and incorrect settings can trigger errors like VAN 9003.
To fix incorrect settings, restart your PC and press the BIOS key (usually F2, Del, or Esc) during startup. In the BIOS menu, go to the Boost or Security tab, enable Secure Boot, and change Boot Mode to UEFI. Save and exit to confirm the changes.
Reboot your system and relaunch Valorant
A quick restart can often resolve errors like VAN 9003. Rebooting your system and relaunching Valorant helps clear out temporary conflicts and ensures a smoother launch. This fix also has the added bonus of effectively restarting Riot’s Vanguard anticheat, which can be a good idea. After all, Vanguard is one of the most common causes for the VAN 9003 error.
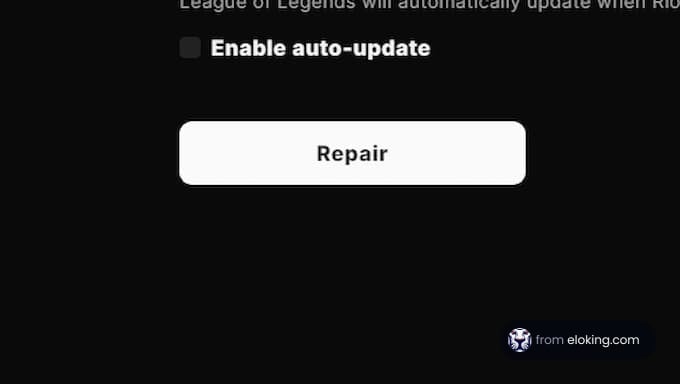
Verify game files
Corrupted or missing game files are a frequent cause of the VAN 9003 error. Verifying the game files helps make sure that all necessary components are intact and up to date, which can sort out integrity-related problems.
You can do this by launching Valorant, then clicking the gear icon located in the top-right corner of the main screen to open the settings menu. Click on “Repair” to initiate a scan. The launcher will check your game files and fix any detected issues. When the scan is done, the launcher will repair any damaged or missing files automatically. Then, restart Valorant and check whether the error continues.
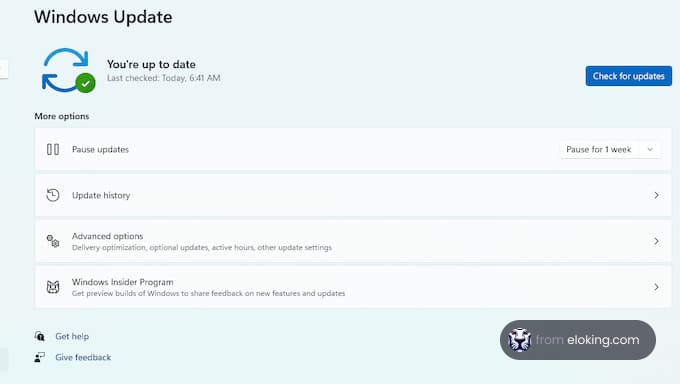
Update Windows
Using an older version of Windows can sometimes cause problems like the VAN 9003 error in Valorant. Keeping Windows up to date not only helps protect your system but also improves performance and makes sure the game runs smoothly.
Use the shortcut Windows+I to quickly access the settings menu.
Go to Update & Security, then click on Windows Update from the menu on the left.
Select Check for updates. If any updates are found, proceed with the installation. Once the process is complete, restart your PC to finalize the changes.
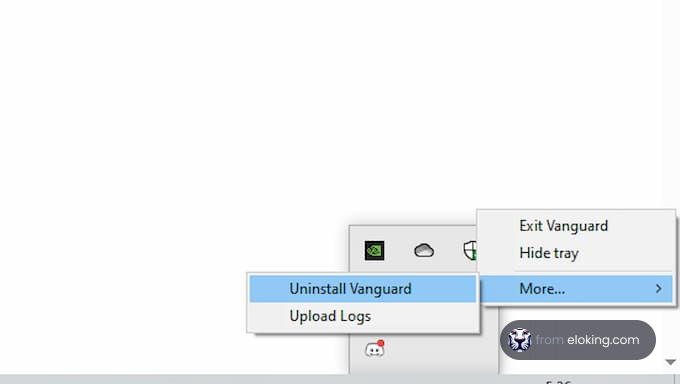
Reinstall Riot Vanguard
As mentioned above, Riot’s Vanguard anticheat is one of the most common causes for Valorant’s VAN 9003 error. Therefore, uninstalling and reinstalling the anticheat software should do the trick if it’s the primary factor causing issues for you.
Follow the steps below to uninstall Riot’s Vanguard:
First, ensure Vanguard is running. This is easily done by just running a Riot-developed game like Valorant or League of Legends
Then, find Vanguard from the Windows System Tray at the bottom right corner of your PC or laptop’s screen
Right-click on Vanguard, then hover over “More.” Finally, click the “Uninstall Vanguard” option
With this done, reinstalling Vanguard is very easy. Just run Valorant again, which will give you a prompt to install Vanguard. Follow the steps on the screen and you’ll get a fresh version of Vanguard installed on your device.
Reinstall Valorant
Should the VAN 9003 error remain a problem after trying the above steps, a full reinstallation of Valorant and its anti-cheat system can work as a last call. This can get rid of any underlying file corruption or configuration conflicts.
Click Start and type Add or Remove Programs into the search bar to begin uninstalling Valorant
To view the list of installed apps, click on the result that shows up
Next, scroll through the list until you find Riot Vanguard
Click on it, then select Uninstall to remove the anti-cheat software from your system
After that, restart your computer and open Valorant again
The launcher will prompt you to reinstall Vanguard. Just follow the on-screen instructions, and once the installation finishes, restart your PC one more time to complete the process.
The VAN 9003 error is often due to system incompatibilities. Try enabling Secure Boot in your BIOS settings, restarting your PC, verifying Valorant game files, or reinstalling Riot Vanguard.
This error usually stems from system incompatibilities or conflicts with Riot's Vanguard anti-cheat. Missing Secure Boot/TPM 2.0, an unsupported Windows version, or driver conflicts can trigger it.
Press Windows + R, type 'msinfo32', and hit Enter. Check 'BIOS Mode' (should be UEFI) and 'Secure Boot State' (should be Enabled). If incorrect, change settings in your BIOS menu.
First, ensure Vanguard is running. Find the Vanguard icon in the Windows System Tray, right-click, hover over 'More', and click 'Uninstall Vanguard'. Then, simply relaunch Valorant and Vanguard will reinstall.
What’s next?
Take your Valorant gameplay to the next level and climb the ranks with ease - buy Valorant boost now!
Purchase Valorant Boost
and start playing at the rank you deserve!