Streamlined three-tier loyalty program where every member enjoys the same high-quality rewards, with benefits escalating at each tier.
Simple yet effective, this program stands as the best deal for Eloking's boosting services, ensuring maximum value and satisfaction for all our users.
Cashback on all Eloking boosts (3%, 5%, 7%)
Discounts for all Eloking boosts (5%, 10%, 15%)
Discount for a friend 🤗
Free daily lootbox spin with industry-leading rewards
Member exclusive season and event offers
Best Sage Ascent Lineups
j
Anthony King
Gamer
03 Feb 2026
Updated On
Sage is one of the best starter agents in Valorant thanks to her versatility and how easy it is to learn her utilities. However, that doesn't mean you can just build one of her walls anywhere and the enemy will get stumped every time, especially on a map like Ascent. So, we're here with four of the best Sage lineups to use in Ascent.
Sage, the quintessential sentinel, brings unparalleled support to the team, making her a crucial pick on the map Ascent. Mastering these Sage wall lineups on Ascent enhances your strategic impact, offering valuable support to your team in both attacking and defending scenarios.
So, without further ado, here are the best Sage lineups for ascent. If you want to master these lineups quickly, we recommend hiring a professional Valorant coach from Eloking to give you some pointers, something you can do with a 20% discount if you use code "BoostToday".
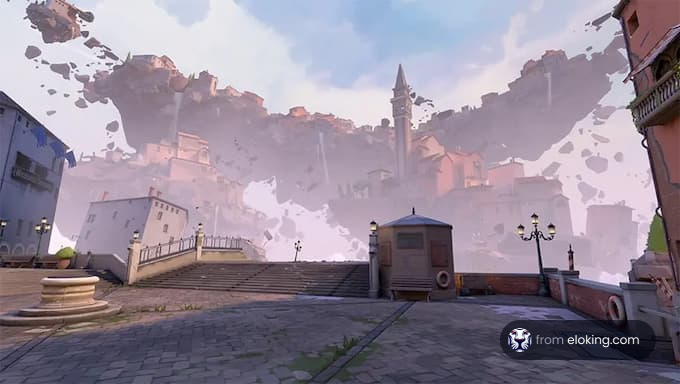
The Usefulness of Sage's Walls on Ascent
Sage emerges as an invaluable asset on the dynamic terrain of Ascent, showcasing her versatility as a sentinel. With the ability to manipulate the battlefield through strategic wall placements and crucial healing abilities, Sage proves to be a linchpin in both attacking and defending scenarios. While we've done lineup guides for Sova and Astra, Sage is arguably better than both on this map.
As the map's layout presents challenges and opportunities, Sage's toolkit becomes particularly influential. Her walls can create safe passages for her team, disrupt enemy advances, and strategically control pivotal areas, contributing significantly to the overall success of the team on the intricate battleground of Ascent.
Whether fortifying A bombsite with protective barriers or orchestrating well-timed pushes on B bombsite, Sage's presence in Ascent is synonymous with tactical advantage and unwavering support for her team.
Struggling to win? Bad teammates?
Purchase a game with one of our PRO players.
One game
Average wait time <30 minutes
$4.00
$3.32 per game
Two games
Average wait time <30 minutes
$8.00
$3.00 per game
Three games
Average wait time <30 minutes
$12.00
$2.50 per game
Sage Walls on Ascent A Bombsite
Now that you know just how useful Sage can be, it's time to go through some of the best wall lineups you can use for the A bombsite. Keep in mind that some of these walls look easier than they actually are to pull off, in which case hiring a professional level Valorant coach from Eloking by using the code "BoostToday" to get a 20% discount might be a good idea.
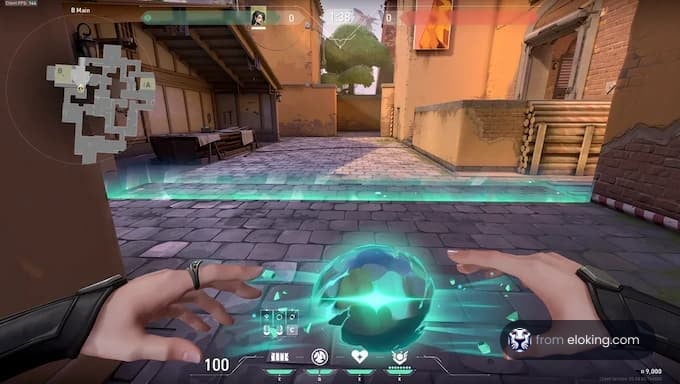
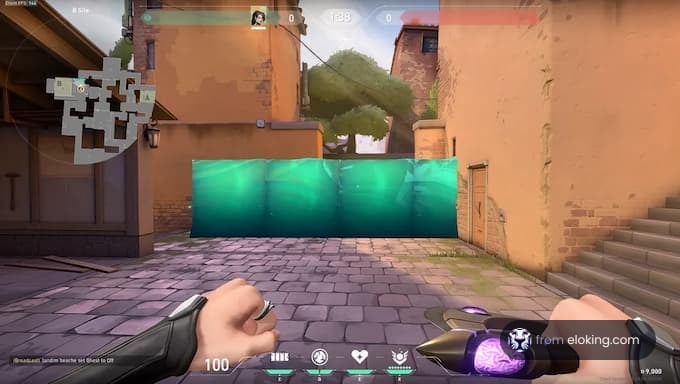
Sage Short Door Wall Setup
The Sage Short Door Wall setup is designed to restrict defender access through the Short Door entrance, providing attackers a secure path to the A bombsite. This setup not only shields the planting process but also buys valuable time for the attacking team to establish post-plant positions and disrupts defenders attempting to breach through Short Door.
To execute this Sage wall lineup:
Start by positioning yourself at a safe distance from Short Door, ensuring you have a clear line of sight to deploy the wall.
Deploy Sage's wall horizontally to close off the Short Door entrance entirely. This creates a barrier that denies defenders an easy route to the bombsite.
Communicate with your team to ensure they are aware of the Short Door wall. This coordination is crucial for a smooth execution, allowing attackers to capitalize on the cover provided by the wall.
With the Short Door secured, instruct your teammates to cross safely to the bombsite. Take advantage of the wall's protection to plant the spike without being exposed to potential defender aggression.
The Sage Short Door Wall serves a dual purpose. Firstly, it acts as a deterrent, forcing defenders to break the wall if they intend to contest the Short Door. This delay disrupts defender rotations and provides attackers with a window of opportunity to secure the site. Secondly, the wall offers cover during the spike plant, minimizing the risk of defenders peeking from Short Door. Overall, this setup capitalizes on Sage's defensive capabilities, creating a favorable scenario for attackers on A bombsite.
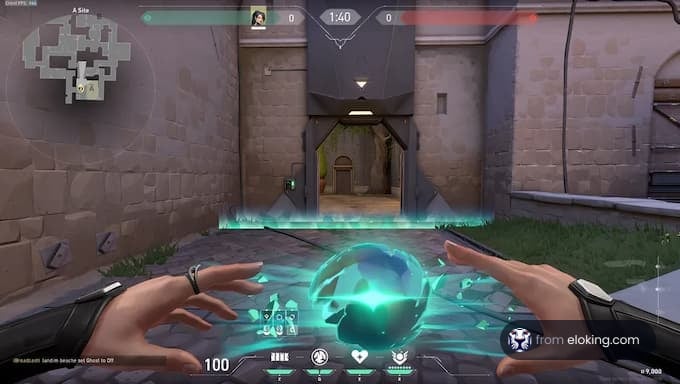
Sage Heaven Wall
The Sage Heaven Wall setup is a strategic choice for attackers aiming to control Heaven on A bombsite. By blocking off this elevated position, Sage grants her team an advantageous foothold, making it harder for defenders to contest the spike plant and giving attackers additional time to execute their strategy.
To execute this wall setup:
Position yourself at a suitable location, providing a clear line of sight to deploy the wall effectively towards Heaven.
Cast Sage's wall vertically to block the entrance to Heaven. Ensure that the wall extends high enough to deny access to defenders attempting to hold this elevated position.
After placing the wall, take an aggressive position in Heaven, utilizing the cover it provides. This allows you or a teammate to control this area more effectively.
Communicate with your team about the Heaven wall setup. This ensures that your teammates are aware of the advantage gained and can adjust their positions accordingly.
The Sage Heaven Wall setup offers a strategic advantage by isolating Heaven from defenders. This forces the opposing team to invest resources and time in breaking the wall or finding alternative routes to contest the spike plant.
The setup also enables attackers to assume aggressive positions in Heaven, granting them control over an important area of the bombsite. Overall, this Sage setup on A bombsite enhances team coordination and provides a tactical edge for securing rounds on Ascent.
Sage Walls on Ascent B Bombsite
The B bombsite on Ascent presents unique challenges and opportunities for attackers, requiring careful coordination and strategic use of Sage's abilities. Below are two Sage wall setups tailored for the B bombsite, along with detailed execution steps and explanations.
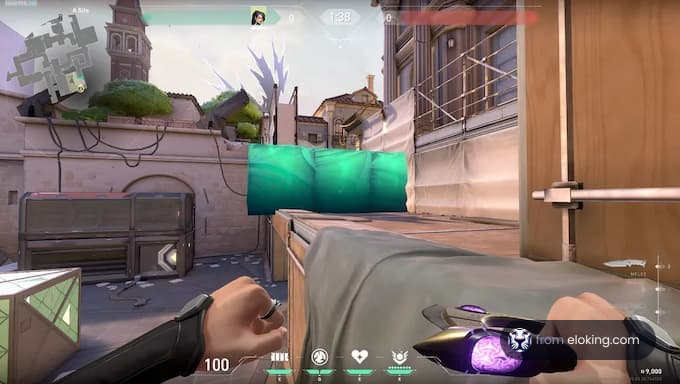
Attacking Sage Wall for Crossing into the Site
This Sage wall setup is a fundamental strategy for attacking the B bombsite on Ascent. By strategically placing the wall, Sage provides cover for her team's crossing into the site, minimizing exposure to potential defenders.
To execute this Sage wall lineup:
Start by positioning Sage near the B Long entrance, ensuring she has a clear line of sight to the open area leading to the bomb site.
Deploy Sage's Barrier Orb parallel to the B bombsite, covering the central area where attackers will cross. The wall should be tall enough to shield teammates from enemy fire.
With the wall in place, coordinate with your teammates to cross into the B bombsite safely. Utilize the cover provided by the wall to avoid taking unnecessary damage during the approach.
This Sage wall setup serves as an effective means of securing a safe passage for the attacking team into the B bombsite. By blocking sightlines from potential defenders, the wall minimizes the risk associated with the open space of B Long. It allows the attacking team to focus on executing the spike plant without immediate threats, making it a staple strategy for coordinated assaults.
Sage CT Wall
Controlling the main entrance to the B bombsite is crucial for attackers, and Sage's CT Wall setup achieves just that. By obstructing the defenders' line of sight from Central Tower (CT), Sage provides cover for her team's entry into the bombsite.
To execute this Sage wall lineup:
Position Sage near the B bombsite entrance, ensuring she has a clear view of the CT area and can quickly deploy the wall.
Cast Sage's Barrier Orb diagonally across the main entrance to the B bombsite from CT. The wall should be tall enough to block sightlines from defenders in CT, creating a temporary barrier for attackers.
With the CT Wall in place, coordinate with your team to safely cross into the B bombsite. The wall acts as a shield, allowing attackers to focus on potential threats from other angles while crossing.
The Sage CT Wall setup is designed to simplify the approach to the B bombsite by narrowing down the angles that attackers need to worry about. By blocking the defenders' line of sight from CT, Sage provides her team with a safer crossing into the bombsite. This strategic placement allows attackers to enter the site more efficiently and puts pressure on defenders to reposition or invest resources to regain control.
FAQs
Sage excels on Ascent due to her versatile walls that can create safe passages, disrupt enemy advances, and control pivotal areas, offering tactical advantages in both attack and defense.
The Short Door Wall blocks defender access, secures a path to A bombsite, shields the spike plant, buys time for post-plant positioning, and disrupts defender rotations.
The Heaven Wall blocks access to the elevated Heaven position on A site, giving attackers an advantage when planting the spike and controlling the area.
Position yourself at a safe distance from Short Door, ensuring you have a clear line of sight to deploy the wall horizontally, completely blocking the entrance.
Position yourself with a clear view of Heaven, then cast Sage's wall vertically to block the entrance completely, denying access to defenders trying to hold the high ground.
What’s next?
Take your Valorant gameplay to the next level and climb the ranks with ease - buy Valorant boost now!
Purchase Valorant Boost
and start playing at the rank you deserve!